www.etsy.com/shop/levansrn

Hi! Who ever thought I'd be a blogger? I'm doing this to connect with people who love creating things. Welcome!

Monday, February 28, 2011

Mini Train Case Tutorial


 Tutorial
Mini Train Case


Ok.  This is my 1st tutorial.  I have been thinking about how to make this for a while now.
 I haven’t been able to find one for a case like this, and this is my first attempt.
The good news is you can learn from my mistakes!  J

So, first thing I did is measure my zipper.  Then, I added 4 inches.   So a 22 inch zipper plus 4 inchesis 28 inches.  Then I made my rectangle based on 28 inches.  8 ½ inches plus 8 ½ inches plus 5 ½ inches plus 5 ½ inches equals 28 inches!  So this is the size of my rectangle. 

Cut 4 pieces of fabric, 2 outer fabric, and 2 lining. Remember to add ¼ inch all the way around for the seams.

Your finished rectangle should be 9 x 6. .

 Then cut interfacing for all.


Iron that on, to give your case shape.


Then, I cut 2 strips, one of each fabric, 30 x 5 ½ inches.

And, 2 strips, one of each fabric, 30 x 1 ½ inches.

Then cut and iron your interfacing to all 4 pieces.

Then, I made my piping, 2 strips 30 inches long, wrapped and sewn around some cord.

I was using my walking foot.  Don’t do this.  Get a piping foot.  I’m going down to Art and Jenny’s and getting one tomorrow.


Then I attached the piping to the bottom of the outer fabric.  And to the top of the outer top fabric.


Next sandwich in the zipper.

Center it and sandwich it.

Sew it to both sides top and bottom.

Then you are ready to apply the top of the case.


Pick a spot right in the middle of the bottom piece of lining, and sew all the way around the rectangle with a ¼ inch seam allowance.  The white piece is the rectangle being sewn onto the side of the case. 
Then do the same for the outer fabric.  The piping will be sandwiched in between. 

This is a pic of me sewing the lining into the bottom.

And this is me sewing the lining into the top.

That’s about as far as I got.  That is when I thought it would be smart to iron the seams, cuz it looks a bit wrinkly.  Then things went terribly wrong.  My stuuuuuupid iron MELTED my zipper!  AAaaaaaaaahhhhh!

So learn from my mistakes! 
  1. piping foot
  2. watch your iron.
  3. Don’t get frustrated, just go get another zipper.  
  4. finish your bag before you blog a tutorial.  (ha ha, I just couldn't wait!)

I haven’t finished the case,  because I have to go get a zipper.  And I know what I need to do next.  I need to make about a 4 inch x 2 inch hemmed strip for the inside and outside and sew that on to the back where the zipper ends.  This will keep the top attached when the case is opened.  

On my next one I think that a handle on the top would be nice.  

:)
Leslie

Sunday, February 27, 2011

Oh Boy! :)

Hi! This is what I did this week.

First I made a lunch box.  I wanted to be able to wipe down the inside, so I went to Joann's and found this super, soft leather like vinyl. I made the lunch box with my favorite Ikea Fabric and lined it with the soft vinyl.

The purse features my favorite Batik.  I have been saving this for a while.  It is lined with the same batik, and also has lots of pockets on the inside.


 The rest of the super soft leather like vinyl is the outer bag.  I made the piping from some phone cord that I found in the garage.   I love it.  Let me know what you think.  Should I make more of both, and sell them as a set?  I can make it in lots of different fabrics... 

Wednesday, February 23, 2011

So Cute!!

I just tried out a pattern that I have been wanting to do for a while.  I found the tutorial on Stumble Upon. The site's name is It's a Pretty Modern Life.  Thank you, Thank you!!!  I love it!

This one is only 3 1/2 X 3 1/2 inches big.  It's SUPER cute!!   Yay!


This one is bigger  8 1/2 X 3 inches.  Perfect for cosmetics!  

You can find them for sale at my Etsy shop!

Yay! This is so much fun!

XOXO

Leslie

Tuesday, February 22, 2011

If you see these two, send them over!


Funny Pictures - Cute Kittens
see more Lolcats and funny pictures

Ok, I'm a sucker for a cute kitty or two. 
I have my own herd of cats, Lily, Jonny, Sweetie Cat, and Mr. Whiskers.
I love icanhascheezeburger.com

I just wish that my kitties would appreciate the lovely outfits that I would be so happy to make for them,
.

                                                                               This is Lily.


This is Mr. Whiskers, with some 'nip.  He likes 'nip.
This is Jonny. In the car....Jonny has a very "colorful" past.
This is Sweetie Cat.  She is from Sweeden.

So there you go. So many kitties to love!  

XOXOXO
Leslie


Monday, February 21, 2011

I LoVe this fabric!

I LoVe this fabric!   I found it at the quilt show and I just adore it!  If anyone knows where to get more of it, let me know!

LoVe !   LoVe!

Leslie

Comments Please!

One of the cool things about having a blog is getting comments from your readers.   I welcome comments, and feel that honest, constructive comments can only make my blog better.

Sooooooooooooooooooooo, have at it!    Comment away!

Just don't spam or send mean comments...This is supposed to be fun and positive!

:D     Leslie

Sunday, February 20, 2011

New Pics


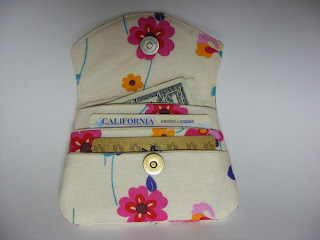
I retook some of the pictures of my wallets, with money and cards in them check them out:


Looks way more flush, huh?

Check them and more out at my Etsy shop: etsy.com/shop/levansrn

Saturday, February 19, 2011

Cilantro Pesto

The other day, my daughter Annie and I went to the farmers market.  We found this great booth that sold a cilantro pesto and a "garlic mint Cheese".  Of course we had to get it! It was sooooo yummy.

So today, I tried to make some and I was totally successful this is what I did:

  Into the Cuisinart I put about a cup of walnuts and juice and zest of 1/2 lemon.  I put a tiny 1 inch jalapeƱo and mixed it up.  Then I put about 1/4 cup of white vinegar and a teaspoon of salt.  Mixed that up, then added 2 lovely fresh bunches of cilantro. Mixed that up and then added water to make it a nice saucy consistency.  There you have it! Adjust the salt to taste.

Then for the garlic mint cheese I put 3 or 4 cloves of garlic with a nice handful of mint and mixed it up in the Cuisinart until it was all chopped up then I added 1/2 a large container of plain yogurt and mixed that up.

Soooo easy!

I served it on warm corn tortillas, but you could use pita or any flat bread.

Yay!!

Leslie

Here We Go!!

Hi!!!!!  This is my 1st post.  Yay!  I'm Leslie, I love making things...pies, music, my latest outlet is sewing.  I have always sewed. I started with a needle and yarn on burlap. Then I learned on my Mom's old black Singer.  It was so cool to make halter tops and pants when I was 10.  Then pillows, and curtains for my 1st apartment.  Baby blankets for my girls, then costumes for their musical theatre troupe.  There is always something to sew!
Big list of Sewing blogs - I'm in, are you?
Locations of visitors to this page